Timeline

The
Timeline represents
a simple mode of visualization. It consists of two parts:
1) The Frames
that
are limited by vertical lines (forming rectangles)
2) The Numbers
of frames that
allow us to know the assigned number of each frame, its duration
and when it will appear in the movie.
Moreover,
there are some tools on the bottom to work with Onion
paper and
its information about the Number
of current frame (1
in the image), the
frame
Speed (12.0
in the image) and the
Time
of the movie (0.0
in the image).
|
|
|
On
the definition level, the Timeline represents
the succession of frames in the Time. The Flash movie will not
be only the frames that appear on the
Timeline one
after another in the order established by the same Timeline
In
order to know more about the
Timeline and
the different types of frames that exist visit our Advanced Page
|
 The
concept of the Layer is
basic to manage Flash efficiently. Because of its importance we will dedicate an
entire unit to it. Even so, let's see a great characteristics of the layers.
A Layer could
be defined as one independent movie of only one level. That is to say, one
layer contains
its own Timeline (with endless frames)
The objects that are at one Layer
share a frame and due to this fact they can "get mixed up" among
themselves. Frequently it could be interesting, but other times it is
convenient to separate the objects in order that they do not interfere
among them. For this, we will create as many layers as necessary. Furthermore
the use of many layers gives place to a good-ordered movie and of easy
use (for example, it is convenient to fix the sounds at one independent
layer called "Sounds"). We will see the advantages and disadvantages
of using layers in the Unit 8.
|
|
The
Working Area consists of numerous parts, let's see them:
 The
most important part is the Stage, we
will draw and fix different elements of our movie. The Stage has
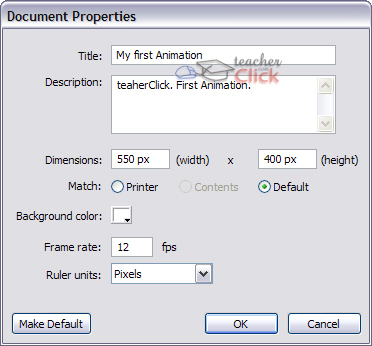
very important properties, due to the fact that they coincide with Document
Properties, in
order to access them, right-click on anywhere on the Stage
with no objects and then on
Document
Properties:
Add metadata to your files so they can be indexed in the search engines. For this fill the Title and Description fields.
Dimensions: They
fix the size of the movie. The smallest size is of 1 x 1 px (pixels) and the biggest
one is of 2880 x 2880 px.
Match: It
causes the coincidence of the movie with the selected size
Background
Color: The
color selected here will be the one of the entire movie.
|
 |
|
Frame Rate: Or
the number of frames per second that appear at the movie.
Ruler units: Unit
used to measure the quantities.
Make Default: Allows to store
the properties of the current document and to apply them to all the new created documents
from this moment. These properties could be changed from this panel whenever you
wish them to.
|
|

In
order to practice these operations, we advise you to do Exercise. Change
the Movies Properties below:
|
Practice
how you can change
some of the main movies attributes.
|
1 Click
with the right button on
the
movie background.
2 Select Document
Properties.
3 In Rules
Unities select Centimeters.
4 Next,
select
Dimensions and
write in the fields
Width 22.46 and
in
Height
16.84 .
5 Press
Accept
and
watch how the size changes. These measures are equal to the standard 640 x 480 px
|


0 comments:
Post a Comment